Getting started with Scheduler
Aiir Scheduler makes music scheduling easier than ever, with the ability to manage your library, create and assign clocks and generate logs from wherever you are.
On this page, we'll walk you through the first steps to get started with Scheduler.
Create your Aiir account and open Scheduler
If you haven't used Aiir before, you will receive an email inviting you to activate your user account. Press the button to set up your password. You will use this each time you log in to your Aiir products.
You may need to check your spam or junk mail folder if you have not received an email invitation.
Once you have created your account, you can log in at on.aiir.com and open Scheduler from the main menu.
Creating your library
When you open Scheduler for the first time, you will be asked to set up your first library. You can have one library per station or multiple stations sharing the same library with individual station rules.
Before we begin, you'll need to give your library a name. This can be the name of your station, company, or whatever suits you.
Choose which stations use the library
Firstly, you'll need to select which stations will use your library. If you already have stations set up in Aiir for your website, mobile app, or Alexa skill, you can pick one that already exists. If not, you can quickly create a station.
Select your automation system
Next, choose which playout automation software you want to create logs for. Some software requires extra metadata for each item scheduled, so choosing your system here will pre-populate the required custom fields in your Scheduler library.
Set your tempos
Audio items can be scheduled based on their speed and pacing. You can customise these to suit your stations' preferences.
Create any required custom fields
If you want to create custom rules for scheduling your stations based on log items' attributes, you can create custom fields to store additional metadata.
For example, in Canada, 35% of music broadcast by most radio stations needs to be produced by Canadian artists. You could create a custom audio field to show a tickbox signifying whether a track should count towards that quota.
Custom fields can contain text, numbers, a checkbox or a date. You can also select whether the field has a special purpose for your playout automation system, such as file paths.
Import items from another scheduler
Unless you're starting a brand new library, you'll want to bring your existing library with you from your current music scheduling application. Aiir Scheduler currently supports importing from:
- PlayoutONE (.asch library export)
- Music 1 (.m1 database)
- MusicMaster (.mmd database)
- Natural Music (.nmd database)
- CSV or TSV export
You can find specific instructions for importing an existing library here.
Create your categories
Categories can be used to group items in your library and apply category-specific rules like dig depth, how items are sorted, and how they are shuffled. You can also give each category a color to quickly identify which category an item belongs to at a glance.
Create your clocks
Clocks are the hour templates Scheduler will use to tell your playout system what to play. You can build them from scratch or duplicate from existing clocks:
Once you have created your clocks, you can assign them using a default template or on a week-by-week basis.
Set up scheduling rules
Scheduler allows you to create two types of rules, which will be applied when creating your logs:
Unbreakable rules
These 'hard' rules will never be broken under any circumstances. This is the default option when you create a new rule.
Breakable rules
You can also create 'soft' rules which Scheduler will try to honour, but if one conflicts with an unbreakable rule, the unbreakable rule takes precedence. You can make a rule breakable by ticking 'This rule can be broken' when creating a rule.
Check out our guide to scheduling rules for more information.
Ready to schedule
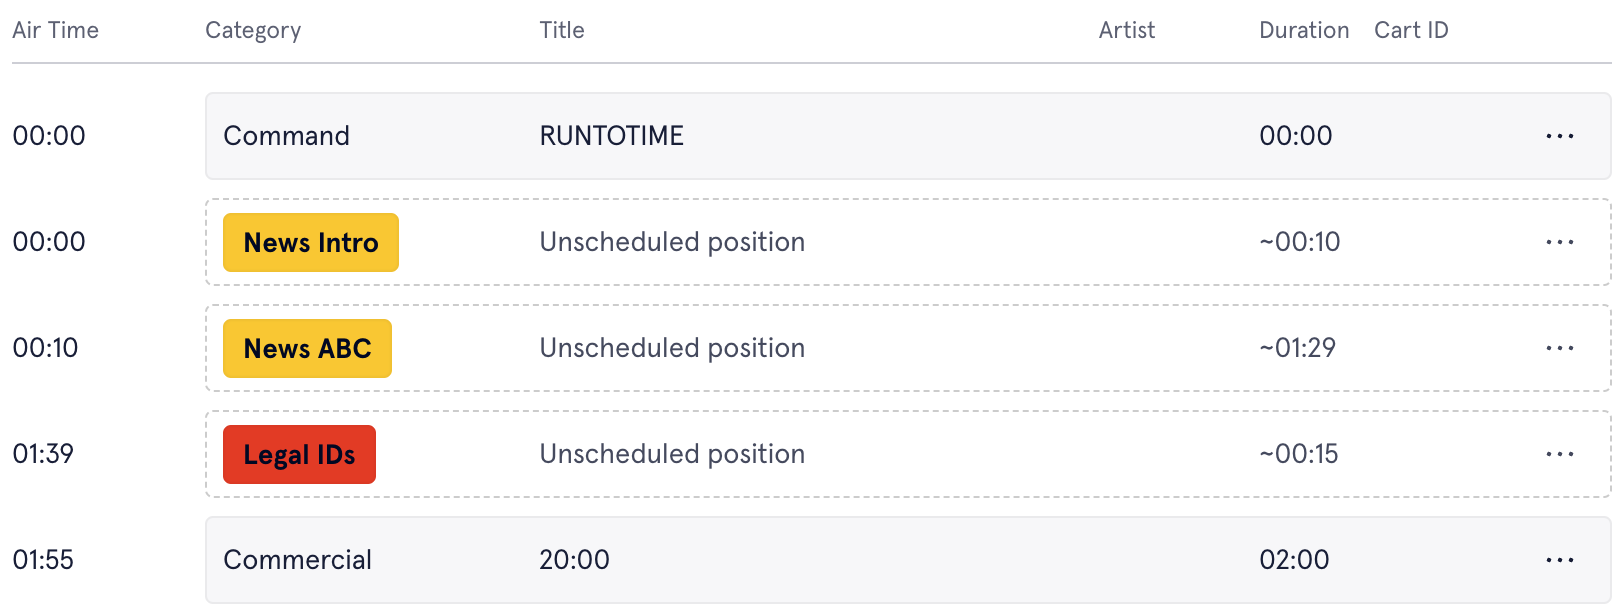
Once you've completed the initial setup, you're ready to start scheduling with Aiir. Open the 'Schedule' tab on the left (or bottom on smaller screens), and select the hours you want to generate logs for.

By default, the category with the fewest items is scheduled first, but you can customize this by changing the 'Pass order'.
You can Unschedule hours using the button on the top right of the Schedule window.
Fixing issues
Any instances where log entries broke your rules are highlighted on the Issues tab. You can work through these by pressing 'Fix' to choose an item to substitute for the conflicting one or pressing 'Ignore' to dismiss the warning.

Exporting logs
When you're ready to export your logs to your playout system, you can create a 'station output'. Just choose your station how you would like the logs to be exported.
You can download them directly or connect Scheduler to an external service like Dropbox. Once a station output has been created, you can use these options each time you want to export new logs.