Creating or editing jobs in Auto Importer
This guide will walk you through the options available when creating a new job in Auto Importer.
Jump to:
-
Category & Type | Timing | Thresholds | Titles | UID range
- Alerts
-
Audio | Exclusions | Rotators
📝 Details Tab
Auto Importer can be configured to run several different jobs, we call these profiles.
To add a profile to Auto Importer, click New from the Auto Importer toolbar and a new window will open to create a new job.
Import Details
| Import name | The name of the profile. |
| Import method | See Import Methods below |
| Import folder | The folder to monitor for the content. This option is not required when using the Nexus import method |
| Station | The station that this profile belongs to. This is only relevant for the Import Log & Nexus import methods |
| Failed retry interval | The amount of time in seconds that Auto Importer should wait before retrying to import a failed file. A file may fail to import if it is locked or the audio you wish to update is currently playing. |
| Days to retain files | Auto Importer automatically moves files to either the Imported or Failed subfolder within the Import Folder. This setting denotes the number of days files should remain in this subfolder before they are deleted. |
| Import enabled | Enables or disables the import profile. |
| Recursive import | When enabled, Auto Importer will look for files to import within subfolders of the Import Folder. When disabled, Auto Importer will only look for files directly in the Import Folder. |
Import Methods
| Import Audio: New UID | Imports audio files from the Import Folder. Files imported will be given the next available UID within the database. |
| Import Audio: Specific UID | Imports audio files from the Import Folder. This method updates existing audio within PlayoutONE. The filename must be named as the UID to update. E.g 123.wav will update the UID 123 in PlayoutONE. If the item doesn't already exist within PlayoutONE then it will be created. |
| Import Log: Music & Traffic | Imports a music log with file extension .dpl or a traffic log with extension .tpl into PlayoutONE. For Music and Traffic Log specifications see Music & Traffic Log Specifications |
| Integration: MusicMaster Nexus | Sets up a connection with the MusicMaster Nexus server for synchronisation of audio and data between PlayoutONE and MusicMaster. |
| Merge: File Merge | Instructs auto importer to watch for up to three files and merge based on an order column within each file. |
🎵 Cart Details
Preserve
If the audio files you are importing already contain metadata readable by PlayoutONE, you can choose which values to preserve when imported - including song title and artist, LUFS and any command markers.
| Title | Preserves title metadata | Early extro | Preserves early extro marker |
| Type | Preserves audio type | Start & end dates | Preserves existing dates |
| Intro | Preserves intro point | Split | Preserves split value |
| Daypart | Preserves the existing daypart rules | Command markers | Preserves any existing command markers |
| Artist | Preserves artist metadata | Oversweep | Preserves current oversweep value |
| Category | Preserves category metadata | LUFS | Preserves LUFS level |
| Year | Preserves year metadata | Audio Envelopes | Preserves existing audio envelopes |
Properties
Additional tasks Auto Importer can perform as audio files are brought into PlayoutONE:
| Normalise | Analyses the audio for LUFS and Peak normalisation. | Ignore PlayoutONE metadata | When checked, if PlayoutONE metadata is detected then it will be ignored. (PlayoutONE metadata can be found on files that are imported from other PlayoutONE systems.) |
| Set extro | Analyses the audio and automatically sets the Extro. The threshold of this setting can be altered in the 'Overrides' tab. | Set audio as fade | Sets the fade value for the item importing to true. This setting can not be used in conjunction with 'Detect if audio fades' |
| AutoDJ | When checked the AutoDJ property will be set to true. | Set audio as split | Sets whether the audio file workas as a split. |
| Detect if audio fades | Analyses the audio to see if the item fades | Oversweep | Sets the oversweep value. |
| Trim silence | Analyses the audio and sets the Trim In and Trim out respectively where the audio starts and ends. The threshold of this setting can be altered in the 'Overrides' tab. | Set colour | Determines which colour items will show as in the log and media finder. |
Audio Format
| Override default format |
By default, audio is converted to the default audio format set within the Auto Importer settings. Enabling this option allows you to override that and change the audio format for items imported through this profile. The available audio formats are:
|
| Apply audio processing |
Enable audio processing on imported audio files using Stereo Tool. You can enter your licence details by clicking 'Settings'. |
🔧 Overrides
Overrides allow you to override values when importing audio into PlayoutONE.
Category & Type
| Type | Sets the type of audio being imported. This must be set for all audio import profiles unless using Preserve Type |
| Category |
Sets the category to import into. This is optional. As well as categories in PlayoutONE to select from you may also select two further custom categories. 'Import Folder Name' allows you to set the category to the folder name that the file belongs to. This is useful when using the Recursive Import option as it allows you to copy several subfolders (80s, 90s, 00s for example) and have the category automatically set based on which folder the file was imported from. 'Top Level Import Folder' to be used again with the Recursive Import option. For example, you have \80s\pop\ 80s\rock & 80s\dance folders within the main Import Folder. When 'Top Level Import Folder' is selected, the 80s folder will be used for the category rather than pop, rock, or dance. |
| Map | See Mapping |
Timing
| Intro | Sets the Intro time for the item being imported. |
| Extro |
Sets the Extro time for the item being imported. If 'Offset+' is checked then the Extro time is offset based on the Extro automatically detected. For example, if the value set to override Extro is 5 seconds, and the Extro automatically detected by Auto Importer is 20 seconds, then the new Extro will be 25. If 'Offset-' is checked then the new Extro in PlayoutONE will be 15 seconds. |
| Early Extro |
Sets the early extro time for the item being imported. If 'Offset (Minus Extro)' is checked then the Early Extro will be calculated based on the Extro. For example, if the value set to override the Early Extro is 5 seconds and then Extro is detected as 15 seconds then the Early Extro will be set to 10 seconds. By default, the Early Extro is set to the same as the Extro. |
| Trim Out | Sets the Trim Out time for the item being imported. |
Thresholds
| Trim In | Sets the threshold for detecting silence at the start of the file being imported. The default value is -60 |
| Extro | Sets the threshold for detecting the Extro. The default value is -12 |
| Trim Out | Sets the threshold for detecting where the audio ends and silence begins for the file being imported. The default value is -90 |
| LUFS | Alters the dB level for the analysed LUFS value. If you need to boost or reduce the audio level after the LUFS normalisation process then alter this value accordingly. The default value is 0. |
Titles
Placeholders may be used with any title overrides.
| Set title to | Sets the title of the item being imported. |
| Set artist to | Sets the artist of the item being imported. |
| Set year to | Sets the Year of the item being imported. This field is limited to a maximum of 4 characters. |
UID Range
Sets the UID Range for items to import into when used with the Import Method 'New UID'.
By default, the start value is set to 1 and the end value is set to 9999999999.
The maximum length for a UID is 10 characters, numbers or a combination of both.
🗓️ Dates & Daypart
Start date
| Enable | Use start date settings |
| Set start date | Select the date from the date picker to set the start date for the item being imported |
| Offset start date |
When enabled, this setting allows you to create a dynamic start date based on the date and time the audio imports. Setting the radio button to 'days' and setting the numeric value to 1, would add 1 day to the start date from the time of import. |
End date
| Enable | Use end date settings |
| Set end date | Select the date from the date picker to set the end date for the item being imported |
| Offset end date |
When enabled, this setting allows you to create a dynamic end date based on the date and time the audio imports. Setting the radio button to 'days' and setting the numeric value to 1, would add 1 day to the end date from the time of import. |
| Set killdate | Sets the killdate one day after the end date |
| Use start & end dates within file |
If start and end dates exist within the file metadata, then they can be extracted and used. Typically this information would be stored within the cart chunk of WAV files. |
Daypart
Use the daypart grid to set the daypart of items imported through this Auto Importer profile.
Green ticks denote an hour when the item may play. Red denotes where the item may not play.
🚨 Alerts
The Alerts tab allows you to configure email notifications for certain events in Auto Importer, including:
- Successful imports
- Failed imports
- Jobs going idle after a set period of time
Multimple email addresses can be specified for each alert type, if seperated with a comma (,)
Email alerts can be configured in the 'Email' tab in Auto Importer settings.
⚙️ Options
Audio
Additional options for importing audio files into PlayoutONE.
| Synchroniser audio import | When checked, the file being imported will not be added to PlayoutONE's Synchroniser table. This prevents the file from being distributed by Synchroniser. |
| Import files that already exist | Allow files already present in PlayoutONE to be duplicated with multiple import jobs. |
| Disable wave meta tag reader |
|
| Re-import failed files | Allow previously failed import jobs to be re-tried |
| Add file extension to title | Append audio files in PlayoutONE with their file extension |
| Ignore metadata splitters | Disregard any + or - splitters in file metadata |
| Trim silence files completely |
|
| Delete existing file first | Remove the audio file from its original location when imported into PlayoutONE. |
| Insert snipped into the log on successful import |
|
| Only add snippet to first note in the log |
|
Exclusions
Allows you to choose certain files to skip being imported into PlayoutONE.
| Exclude/Import files beginning with... | If all the files in a certain import job will follow a similar naming convention, you can use this rule to either exclude all files with a certain prefix or exclude any files that doesn't have it |
| Exclude files smaller than... | Specify a minimum file size for audio to be imported |
| Exlcude files where filename length is... | Tells Auto Importer to disregard any files with too many characters |
| Exclude file extensions... | Specify any file types you do not want to be imported into PlayoutONE |
| Retry excluded files | Allows Auto Importer to scan previously excluded files |
Rotators
| Add audio to rotate carts | Adds the file being imported to the selected rotator |
| Remove audio from rotate carts | Removes the file being imported from the selected rotator |
| Add to top of rotate list | When checked, the file will be added to the top of the list within the selected rotator |
| Add to bottom of rotate list | When checked, the file will be added to the bottom of the list within the selected rotator |
⌨️ Commands
Command markers
Auto Importer can add PlayoutONE command markers to the extro of audio files being imported.
| Add command marker to extro | Check to enable |
| Command | Your chosen command to add as a marker |
| Params | The command parameters to go with the command selected |
| Predefined |
Instead of selecting a command, you can select a predefined command. Predefined commands are made within Command Manager. |
| Alter log extro |
Setting a time here will alter the extro shown in the log rather than altering the extro in the media finder. This is used to fool the log into thinking the item is longer or shorter than it is. |
FileCopy jobs
Associate import jobs with tasks in FileCopy.
📋 Reports
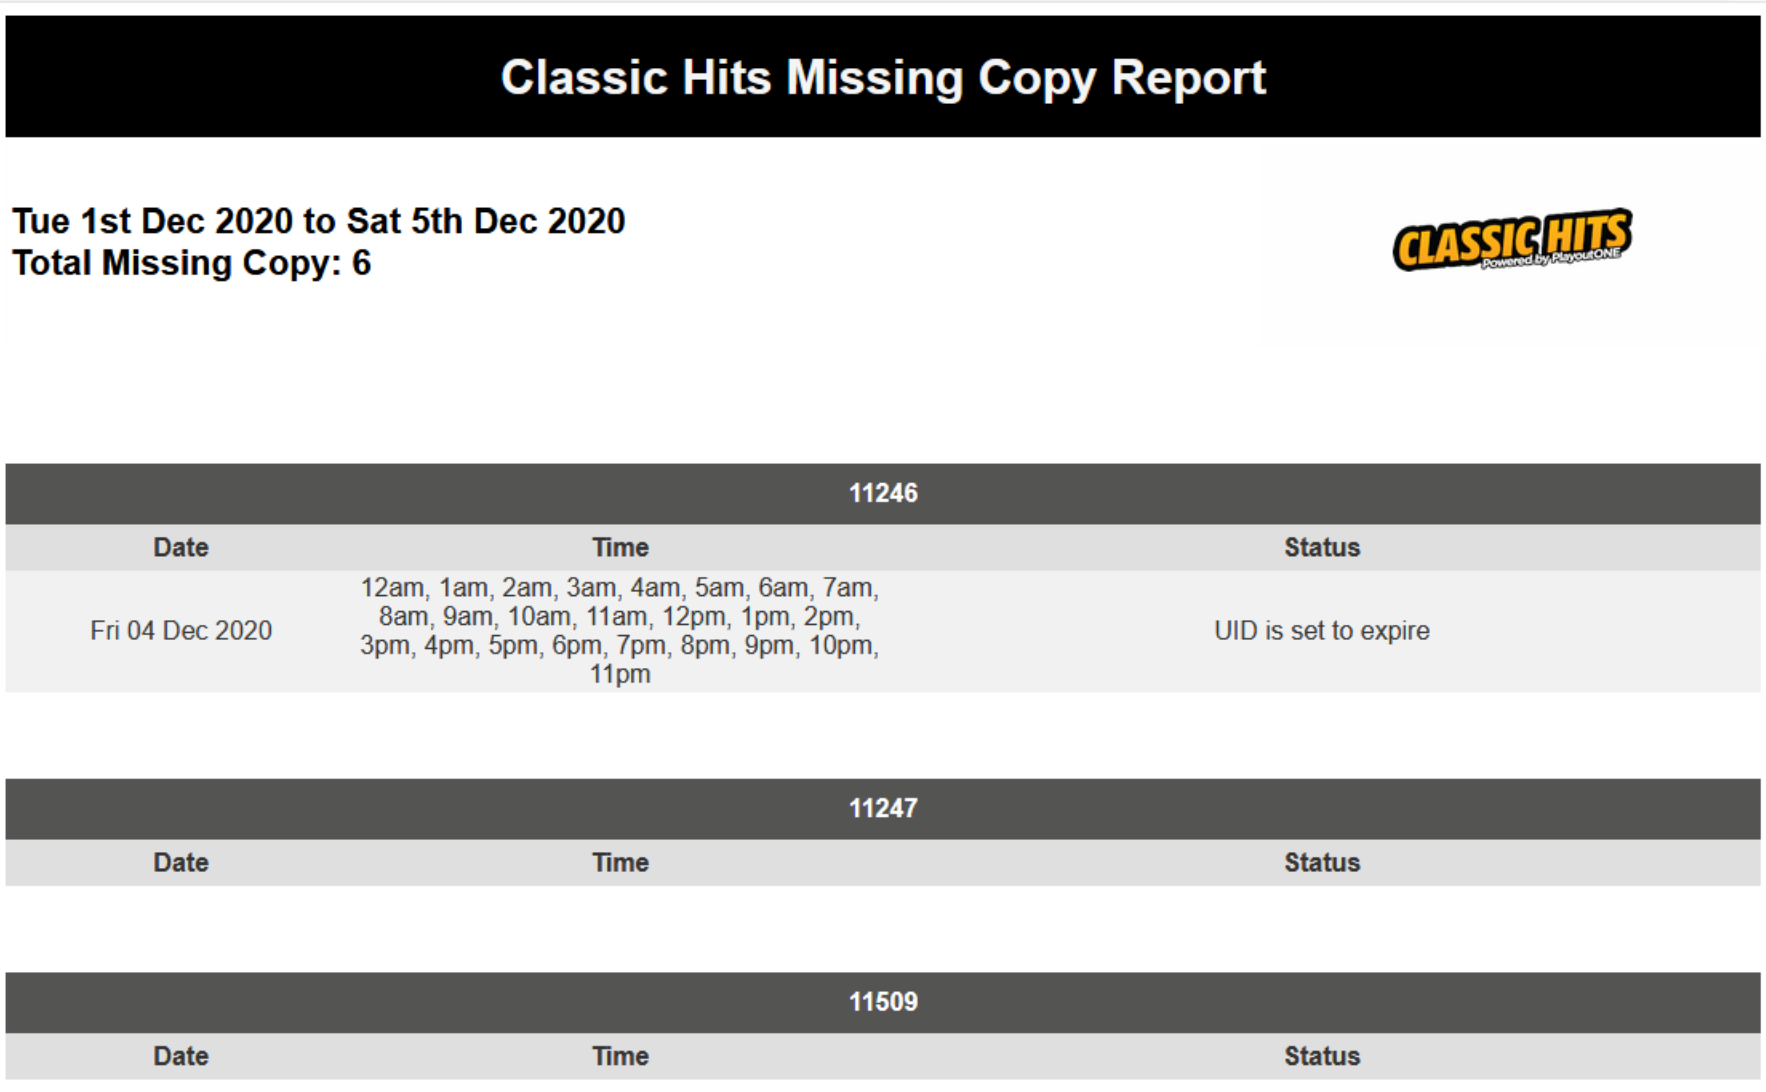
Auto Importer can be configured to generate various reports when a Music or Traffic Log file has been imported.
Missing audio
The missing copy report will let you know if any audio is missing from the log that was imported.
| Output directory | The folder where the report will be written. |
| Report type | Select from all audio types, production, music or commercials. |
| File type | Choose the file format you would like your report in. |
| CSV report delimiter | Choose which character to use to seperate data in a CSV report |
| Enable to have the report sent by email. (You will need to configure Auto Importer's email settings for this to work) | |
| Only email when there are missing items | Skip sending emails when there are no issues with the logs |
| Email recipients | Where the report should be emailed. Multiple addresses can be separated with a comma (,) |
| Expired types to ignore | Skip reporting certain audio types when expired |
| UIDs to ignore | Skip reporting certain UIDs |
Split balance
The report provides a PDF report that shows whether a split Traffic Log is balanced with the main Music Log.
| Output directory | The folder where the report will be written. |
| Master station | The master station to compare the commercial break times with. |
| Enable to have the report sent by email. (You will need to configure Auto Importer's email settings for this to work) | |
| Email recipients | Where the report should be emailed. Multiple addresses can be separated with a comma (,) |
| Delete report after... | Schedule deletion of old split reports after a certain number of days. |
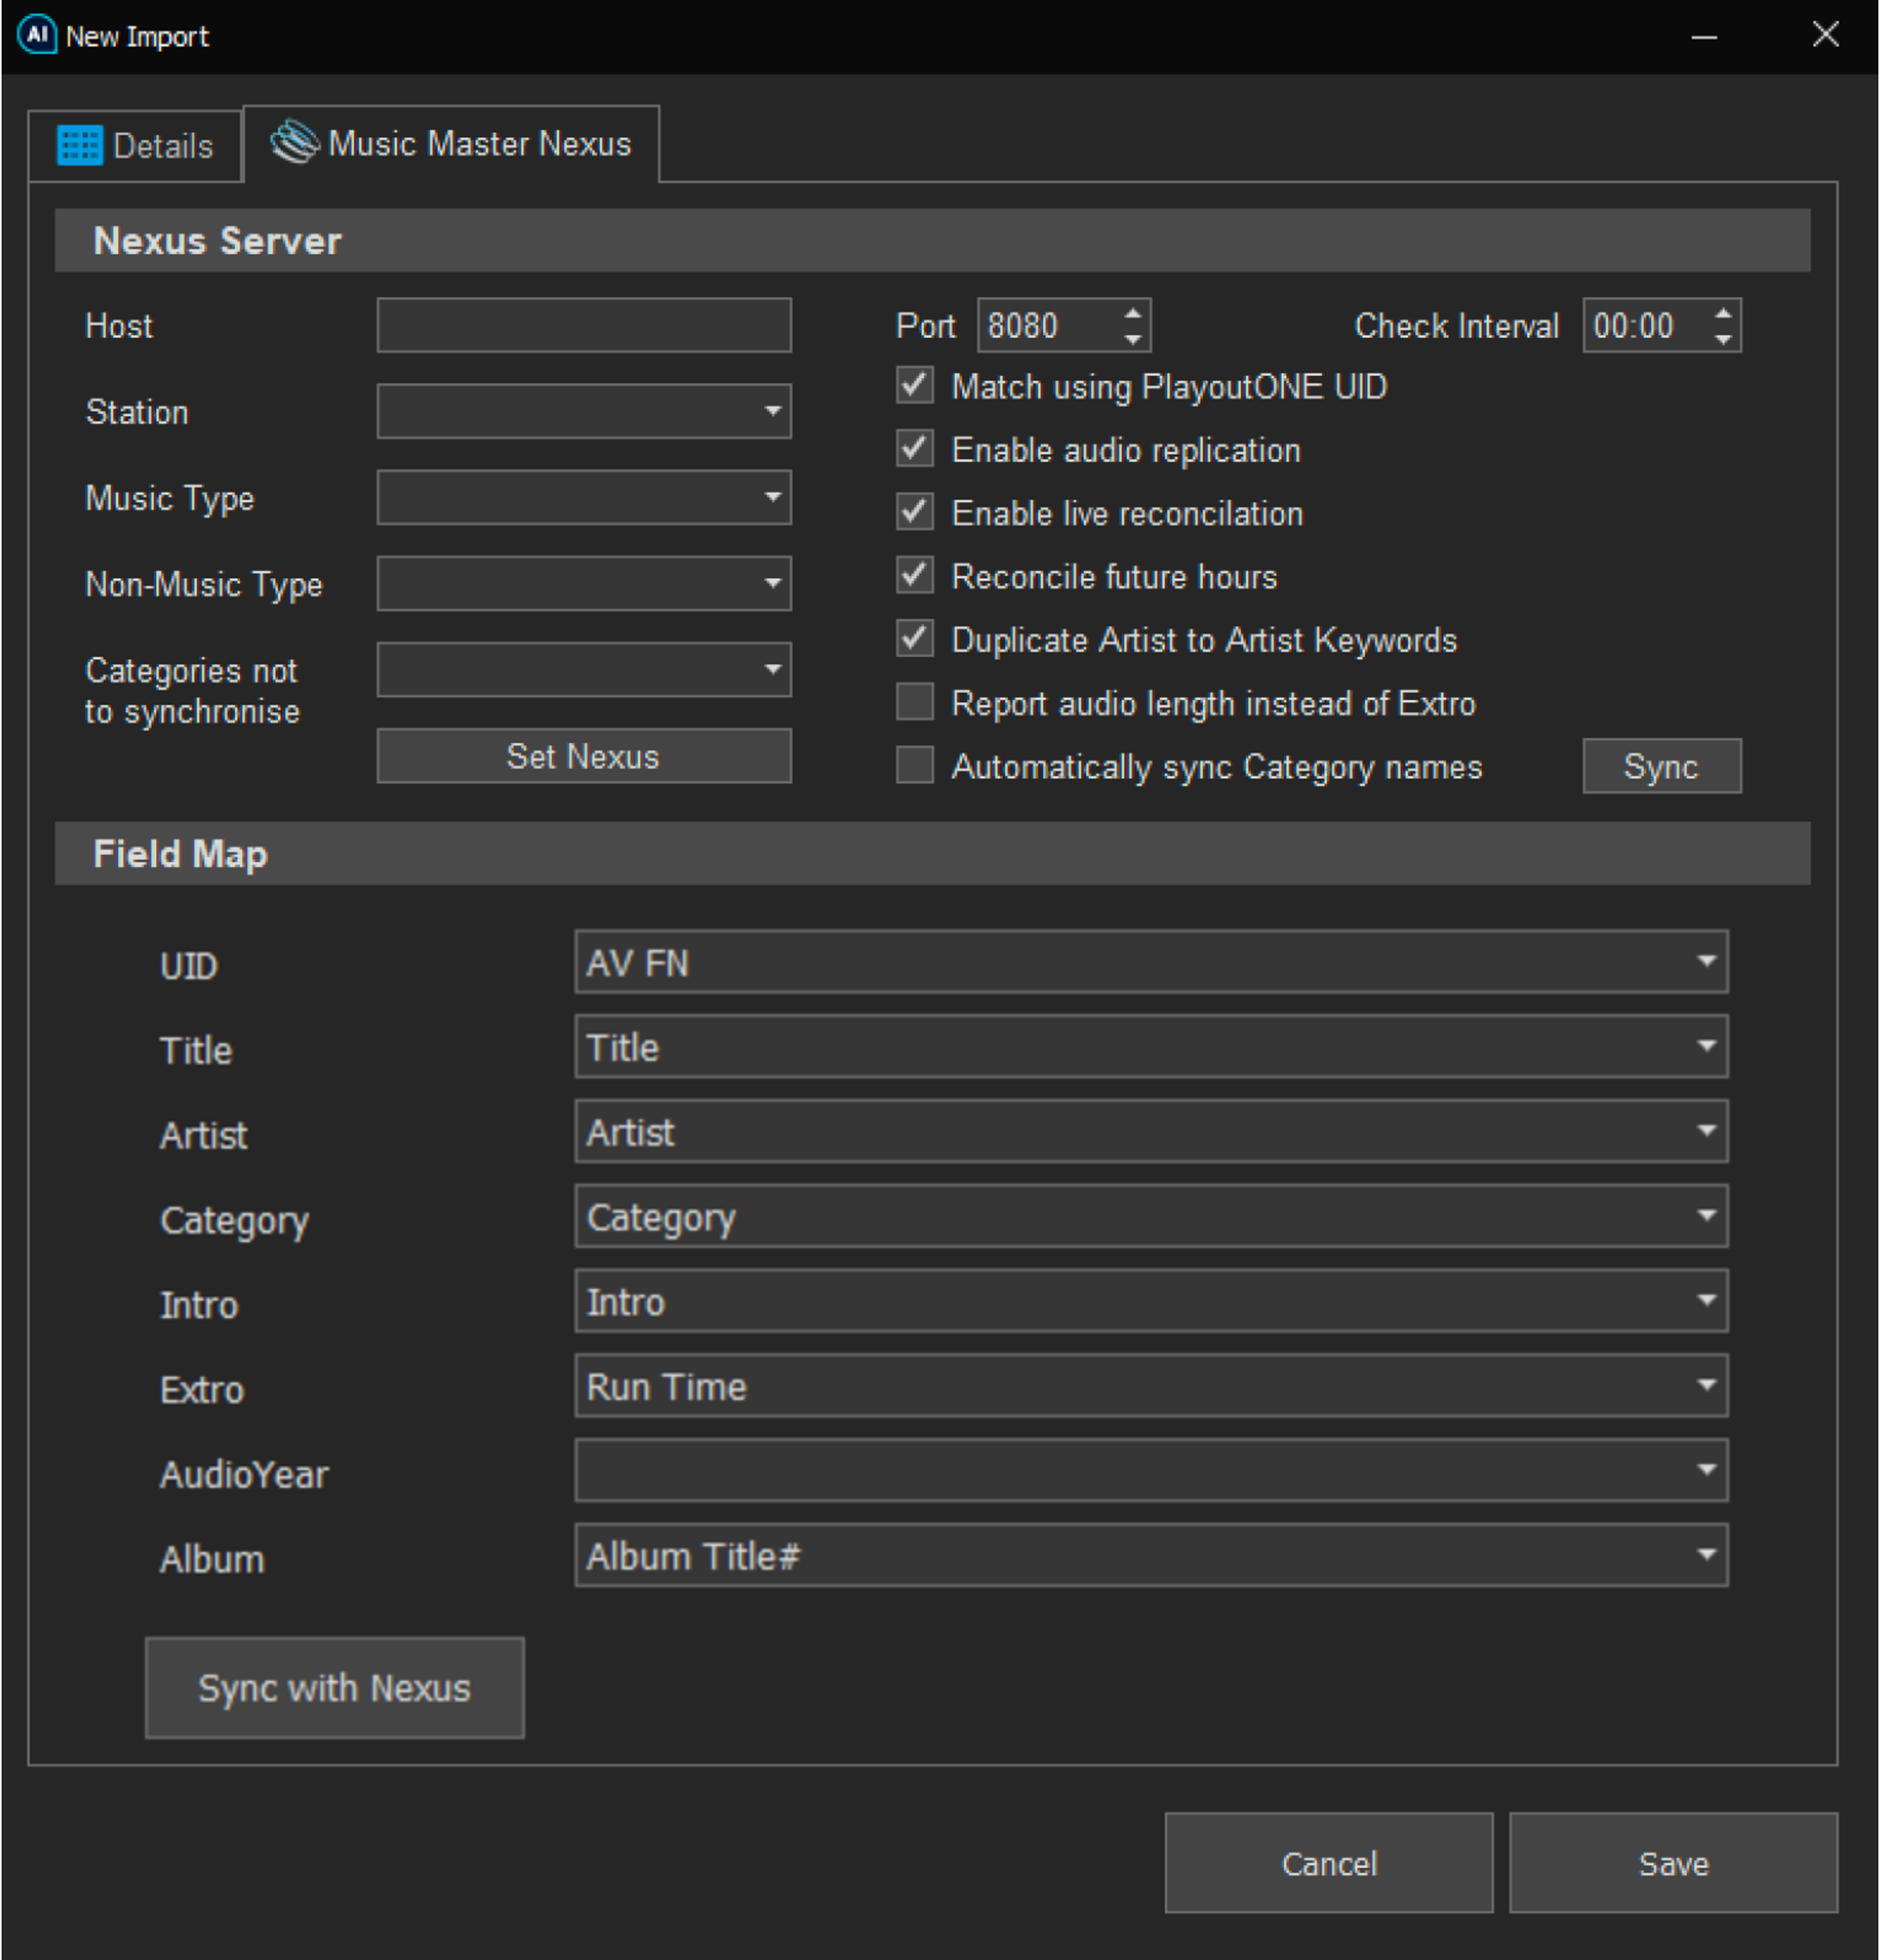
🎶 MusicMaster Nexus
Auto Importer can be configured to work with MusicMaster Scheduling via the MusicMaster Nexus server.
The Nexus server will need to be set up before you can configure the settings within Auto Importer.
Nexus server
| Host | The PC name or IP address of the server running MusicMaster Nexus. |
| Port | The port number that the Nexus application is listening to on the server. |
| Set Nexus | Press once the host and port have been configured. This allows you to then configure the rest of the settings. |
| Station | The MusicMaster station. You can configure this once you've hit the Set Nexus button. |
| Music type | The music type you wish new music files to belong to within PlayoutONE. |
| Non-Music type | The non-music type you wish new non-music files to belong to within PlayoutONE. |
| Match using PlayoutONE UID | Ticked by default. Compares the UID in both PlayoutONE and MusicMaster to generate a match upon the first Synchronisation. |
Field map
Match the PlayoutONE fields on the left with the MusicMaster fields on the right via the drop-down box.
📁 File Merge
Auto Importer can merge up to three flat text-based files together to generate one file.
This could be a music log and a production log that needs to be merged to create a single log for Auto Importer to bring into PlayoutONE.
All files must have a common order field that Auto Importer can use to order and merge the files.
Files to be merged
| File extensions | Extension of the files to merge (for example, .txt or .csv) |
| File delimiter | The delimiter all the files are formatted with. |
| All files contain #HOURSTART headers | If merging multiple .dpl files and all contain hour headers then tick this box so that the final file only contains a single hour header. |
| Order column | The column that contains the order to merge. Enter the column number and choose the column format from the dropdown menu. |
| Lines to ignore |
Specify any text here. If a line in the merge file starts with this text then it will be ignored. Multiple ignore strings can be entered on seperate lines. |
Output
| Output folder | The folder where the final merge file will be created. |
| Output filename |
The name of the merged file. Use the following placeholders to use the filenames from either of the three merged files:
You will need to specify the extension. For example, if mergefile1 is 'production.txt' and we specify 'mergefile1.txt2' as the output filename, then the output file will be called 'production.txt2'. |